The lenovo disaster
So I needed a super computer with super duper properties (see the section on
the Lenovo Ideapad Pro bla bla bla
but this giant 14 inch machine was based on a network card that was not supported by Linux. And some more details.
But I still needed a replacement, or an extension, to my current main machine, the 2017
Dell Latitude E5570
which is lacking in the display section.
Although the E5570 is a machine which still has lots of power and stamina, the screen is below par: Twisted Nematic
(TN) technology, 200 nits max brightness, very low contrast ratio. It is nearly impossible to process pictures,
taken with my Nikon D7100, to be published on
knipser.nl.
A new laptop

I need a fairly up to date machine, preferably not too expensive, that has the following demands:
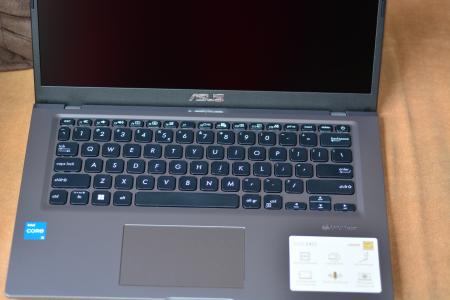
The machine arrived

CoolBlue kept their word and delivered the box today. In it was a very sleek laptop. Small. Light. Pretty. This true 14 inch computer is a lot smaller than my Dell E5430, which also is 14" (yes I have a series of Dell computers). With the computer came the wall wart power supply and three useless booklets. I started by charging the battery which took about an hour. Then came a small nightmare.
I wanted to boot off USB drive, but the computer already had started it's Windows 11 installation and there was no possibility to stop it. So after 5 failed attempts to interrupt it, I just finished the installation (without supplying user IDs). Now I could power the machine down, which is required if you want to boot it up. Asus is definitely on a Microsoft leash.
The BIOS
Normally you start the machine and press the DEL, F2 or F12 key repeatedly to enter the BIOS or for the bootmanager mode. On the X415 the hotkeys are ESC for the bootmanager and F2 for the setup. But you can also enter the BIOS setup through the ESC key. Remember that. Forget the F2 key. The main BIOS menu screen is fully graphical. It even has an animation for the fan-speed and a graph for the CPU load and (processor die) temperature. It looks nice but it is useless.
If you want to get things done you need to enter 'Advanced mode' by pressing F7. Now you enter a more traditional BIOS setup. Keep in mind that this is an EFI BIOS (although it is never mentioned as such). Real People turn off the 'Secure boot' and the 'Fast boot' in the usual ways. You may start looking for a 'Legacy mode' switch. But you will not find one. You may be tempted to define a new boot device. I tried and failed. And didn't need one either. It was interesting to find out how to delete my handcrafted boot option.
Spoiler: the boot option is for entering a descriptor for a second operating system after it was installed in the EFI subsystem.
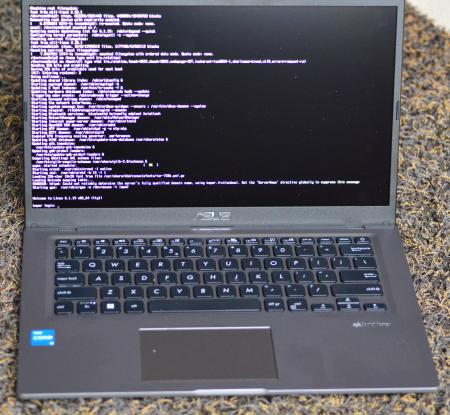
Starting Slackware Live
It took quite some fiddling and in the end all the fiddling was unnecessary... If you want to boot from USB device, you do as follows:
Slackware 64 booted right into the LIVE environment. I chose for an XFCE session and logged on (password = 'live').
Since this is a high res 14" screen the 1920 x 1080 resolution made things quite small. I opened the settings
manager and in 'Appearance' and 'Fonts' I chose a 120 dpi setting. Later, much later, I changed the resolution to
1440 x 810 which also was easier on my old eyes. You choose your likings. This Asus uses an RTL NIC so it worked
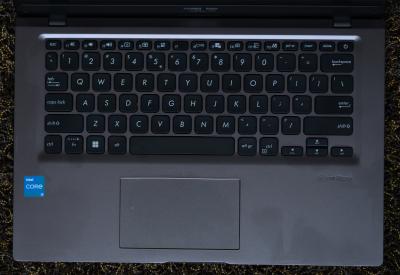
out of the box. The sound definitely outperformed my Dell E5570. The keyboard is simply GOOD. Better than 'just OK'
by a lot. This is a very nice machine and Slackware fits it like a glove.
The XFCE power manager came with good estimations for the battery level and remaining run times. Since this was the
first discharge of the battery I let it run until empty. At 5% the machine warned me of an empty battery and gave
me three options. Since this is a live USB, immediately shutting down was no problem at all.
How about the screen colours?
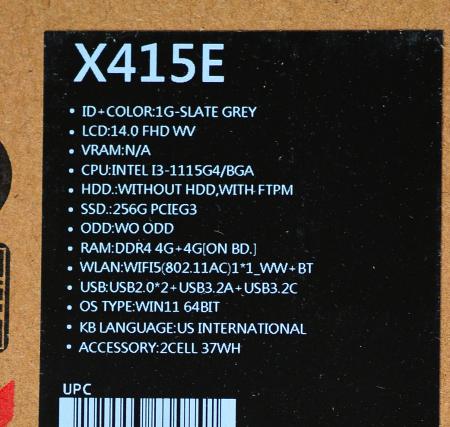
One of the reasons to start out this enterprise was the disappointing colours of the E5570's screen. How about the screen colours of the x415? It is 'just' 250 nits of brightness and 'only' 45% NTSC (=63% sRGB).
I'll be short. When you are spoiled by colours from a decent Nikon camera, 45% NTSC is plenty good for viewing
pictures. So when you got a Canon or a Sony, even 20% NTSC would be more than enough... Just joking of course.
It looks like you only 'need' 100% sRGB when you have an Apple or too much money. I am very picky when it comes to
the colours of my images. But this Asus x415 with 45% NTSC and 'just' 250 nits of brightness was exactly right. No
need to go hunting for the more expensive 500 nits, PanTone proof screens. 45% NTSC is more than enough for viewing
digital pictures. I do have to say here: I shoot in JPEG, not in RAW. I know my camera gear so I am able to produce
good JPG images without the very time consuming 'developing' of RAW images.
Next stop: preparing to install Slackware Current
How will the BIOS react when I nuke the SSD? Does the BIOS know there is a Windows bootloader? Or does the BIOS just look at the disk every restart and then give THAT option? We'll soon find out. I guess option 2 will be the case. The BIOS inspects each disk: the SSD and possibly USB drives and lists all bootable devices in its boot list.
I never installed an EFI partitioned Linux before so this is new. I cannot loose much, since there is nothing on the Windows partition. After reading up, it will be something like
While doing some experiments I came to a 'disturbing' conclusion. Normally I download my ISO images from the norwegian slackware repository,
ftp://ftp.slackware.no/slackware/slackware-iso/slackware-current-iso/(firefox cannot handle FTP sites so please use SeaMonkey here) but when I copy the image to a USB stick with
dd if=slackware64-current-install-dvd.iso of=/dev/sdb bs=16Mthe image from Norway does not boot. Asus' EFI BIOS does not recognize the EFI signature on the boot stick.
Luckily Alien Bob has his own repository and apparently Eric makes better EFI images. So when I get the similar boot disc from
https://slackware.nl/slackware/slackware64-current-iso/and I dd this file to the USB stick, it is recognized by Asus' BIOS immediately and it boots straight into the installer when I select it in the boot menu and next press Enter.
Weeks later I discovered the cause of the annoyance. All images, except the images of Alien Bob, require you to run 'isohybrid' on the virgin ISO file tomake it bootable as USB stick:
isohybrid slackware-image-file-not-from-Alien-Bob.isoand then the file is USB bootable.
Installing Slackware current (14-03-2023)
I've been postponing this for days. Suppose I brick the system? Well, you can't brick it. In the worst case you have to buy a copy of Windows again. But that was very unlikely. So I decided my strategy: I was to edit the hard disk layout but keep the EFI partition as it was (with the Windows entry and the BIOS flash file) and just create Linux partitions after deleting all Windows related stuff.
Partitioning
I started from the Linux installer USB disk. That was easy. No need for the kms.s image; the Asus VGA system worked perfectly. The texts were as usual. Log on as 'root'. Run 'cgdisk' (the EFI version of 'cfdisk'). Initially the partitioning was the usual Windows nonsense with the many recovery partitions. I changed it to
Installing
After partitioning, you run 'setup'. Go straight to the formatting part where you identify where each partition is
to be mounted. All are formatted in 'ext4'. It took quite some time to format the 200 GB partition of the SSD.
Longer than it would have taken a spinning disk HDD.
Next choose to install the software: choose the full install. We have plenty of disk space. 10 minutes later the
computer is done. When it is time to have LILO install the bootloader skip that step and arrive at the eLILO
section. Just follow the text commands on the screen. After this you enter the timezone, network details (just
choose the network manager) and within minutes you are rebooting the computer.
First boot
As soon as the 'In search of incredible' splash screen appears, press ESC to enter the bootmanager. The computer
now has two options (Windows, still in the EFI) and Slackware. Choose the third option: Enter setup. Press F7, go
to the BOOT tab and make an entry for Slackware by creating a boot option. F10 (save and exit) and restart.
In the second start (hit ESC again when the splash screen appears) the BIOS has read the tables. Choose 'Enter
setup' again and in the right pane you see two boot options. Drag the Linux option above the Windows option. Save
and exit. Now the machine starts Slackware by default. No need to ever press ESC again.
From there, the machine boots in 3 or 4 seconds flat.
Set a console font
This machine has a 1920x1080 14 inch screen. That produces very small symbols on screen (in command line mode). So I set a better font. Log on as root and enter
setconsolefontA text frame window appears and you can choose from a few hundreds fonts. Pick one, press Enter and you are given the chance to have a view and type some text. Type '1' on a line by itself to accept this font, '2' on a line by itself to get back to the text window.
When done, the font is set to the current console you are working in. After the next reboot the font is installed systemwide. You can find which font is selected in the file /etc/rc.d/rc.font Just issue the command
cat /etc/rc.d/rc.fontto see it.
jan@koper:~$ cat /etc/rc.d/rc.font
#!/bin/sh
#
# This selects your default screen font from among the ones in
# /usr/share/kbd/consolefonts.
#
setfont -v ter-720b.psf.gz
jan@koper:~$
This is a nice square font that will be better to read on this high resolution screen. Your milage may vary.
Set a time server
Set the time server to 'server 0.pool.ntp.org iburst' by removing the '#' in front of it in the file '/etc/ntp.conf' To do that open the file with a text editor like 'jed':
jed /etc/ntp.confJust arrow the cursor to the '#', press Ctrl-D and that was it. Now press Ctrl-X Ctrl-S to save the file and Ctrl-X Ctrl-C to exit the editor. The timeserver will be used at the next reboot, or immediately after issuing the command
/etc/rc.d/rc.ntpd restartThis is Linux. No need for a reboot for just restarting a daemon (other word for a system level process). Only after changing a kernel a reboot is required.
Set an FTP server
You can choose which FTP server will be active. With an FTP server active (FTP clients always work) other machines can approach you for exchanging files. The FTP server, just like many other protocol servers, are determined in /etc/inetd.conf. Open the file like:
jed /etc/inted.confand find the line
# ftp stream tcp nowait root /usr/sbin/tcpd proftpdJust remove the '#' sign and save the file. Changes take effect after the daemon is (re)started.
From now on, you can access the computer with FTP clients like ncftp and gftp.
How much disk space do I have
To view a list of all the disks in the system, issue the command 'df -h'
(
Filesystem      Size  Used Avail Use% Mounted on
tmpfs            32M  1.6M   31M   5% /run
devtmpfs        8.0M     0  8.0M   0% /dev
/dev/nvme0n1p2   40G   16G   22G  44% /
tmpfs           3.8G     0  3.8G   0% /dev/shm
cgroup_root     8.0M     0  8.0M   0% /sys/fs/cgroup
/dev/nvme0n1p3  195G  331M  184G   1% /home
/dev/nvme0n1p1  256M   66M  191M  26% /boot/efi
tmpfs           766M  8.0K  766M   1% /run/user/1000
tmpfs is a virtual disk in memory. nvme0n1 is the solid state disk.
Going graphical user interface

I could have chosen to make this machine fully GUI (Graphical User Interface) from start to finish using XDM but I find the CLI (Command Line Interface) so comfortable for getting things done. So I start the GUI with the 'startx' command.
The first time you go GUI, the system uses the default values for your kind of hardware. So you need to do some tweakings. For this choose 'Applications' (top left), Settings, Manager. Now you get a nice menu from which to work.
Add personalisation
It is convenient to have a directory with personal programs. Preferred versions of standard programs or selfmade programs. As a normal user you cannot put them in systemwide bin directories such as '/usr/bin' and '/usr/local/bin'. So the best option is to make '~/.local/bin' and put trusted shell scripts and executables in there. And being the lazy kind of guy I am, I want to just type 'lls' or 'tls' to generate dedicated directory listings.
.bashrc
Below is my '.bashrc' file which is executed at startup
. /etc/profile

alias lls='ls -lh'
alias tls='ls -lhrct'
alias cls='clear'

export PATH=/home/jan/.local/bin:$PATH
In the last line I add '.local/bin' to the path in such a way that is is searvhed first. So when I make a personal (and hence better) version fo the 'ls' command, mine is found first.
Access debian packages
Sometimes there just isn't a slackware package around, but there is a DEBian package. I found (I did not make it) a script on the net that converts any DEB package into a Slackware txz package. I used it many times and until now they all worked. The script:
#!/bin/sh
# xz2txz.sh deb2txz.sh rpm2txz.sh	2015-04-28 18:18:09

ren()		# Rename to be Slackware Compliant
{
n=$(awk '{print match($0,"[_-][0-9]+[.]")-1;}'<<< $1)
r=${1:n};
v=$(expr "${1:n}" : '\([0-9._-]*[0-9]\)');
r=${1:n}; r=${r#$v}; r=${r//-/.}; r=${r//_/.}; r=${r%.*};
a=${r##*.}; r=${r%.*};
[[ ${v%-*} ]] && t=${v##*-}; v=${v%-${t:=1}};
f=${1:0:n}-${v:1}$r-$a-$t.txz; echo "->  $f"
}

sld()		# Create very brief one-liner in 'slack-desc'
{
[[ ! -d $fr/install ]] && mkdir $fr/install
sd=$fr/install/slack-desc
l=${1:0:n}:" ${v:1} ($1)"; l=${l:0:79};
echo $l > $sd
for ((i=0; i<10; i++)); do echo ${1:0:n}: >> $sd; done
echo "<slack-desc>"
head -n1 $sd
}

deb2tgz()
{
    # Convert .deb. packages to .tgz.   2014-11-13 19:45:33
    # Whittled Down Version	2015-04-28 00:32:11
    # Variables
    c='\e[36m'
    r='\e[31m'
    e=`tput sgr0`

    # Let's start
    if [ "$1" = "" ]; then
        echo -e "${c}need a deb package as an argument, example: $0 /mnt/sda2/debian_packages/package.deb"$e | fmt -w 80
        return 1;
    fi

    # Work only on deb packages:

    # Create module:
	y=$1
        mod=`readlink -f $y | sed s/.deb$/.xzm/`
        pkg=`echo $mod | awk -F/ '{print$NF}' | sed s/.xzm//g`
        dataname=`ar t $y | grep data`
    echo dataname = $dataname
    # echo mod = $mod
    echo Creating Package: ${mod%.xzm}.tgz
    pushd .  > /dev/null
       case $dataname in
       data.tar.gz)
       mkdir /tmp/deb2xzm$$ && cp $y /tmp/deb2xzm$$ && cd /tmp/deb2xzm$$ && /usr/bin/ar x * data.tar.gz && mv data.tar.gz $pkg.tgz && mv /tmp/deb2xzm$$/$pkg.tgz ${mod%.xzm}.tgz
       ;;
       data.tar.lzma)
       mkdir /tmp/deb2xzm$$ && cp $y /tmp/deb2xzm$$ && cd /tmp/deb2xzm$$ && /usr/bin/ar x * data.tar.lzma && unxz data.tar.lzma && gzip data.tar && mv data.tar.gz $pkg.tgz  && mv /tmp/deb2xzm$$/$pkg.tgz ${mod%.xzm}.tgz
       ;;
       data.tar.xz)
       mkdir /tmp/deb2xzm$$ && cp $y /tmp/deb2xzm$$ && cd /tmp/deb2xzm$$ && /usr/bin/ar x * data.tar.xz && unxz data.tar.xz && gzip data.tar && mv data.tar.gz $pkg.tgz  && mv /tmp/deb2xzm$$/$pkg.tgz ${mod%.xzm}.tgz
       ;;
       esac
       rm -rf /tmp/deb2xzm$$
    popd  > /dev/null
}

rpm2txz()
{
  [[ ${1##*.} != rpm ]] && { echo Not rpm; return 1; }
  pg=${1##*/}; can=$(readlink -f $1)
  fr=/tmp/fke$$
  pushd .  > /dev/null
  mkdir $fr && cd $fr
  rpm2cpio $can | cpio -dim
  popd  > /dev/null
  ren $pg
  sld $pg
  pushd .  > /dev/null
  cd $fr
  /sbin/makepkg -l y -c n  ${can%/*}/$f
  popd  > /dev/null
  rm -rf $fr
}

deb2txz()
{
  [[ ${1##*.} != deb ]] && { echo Not deb; return 1; }
  pg=${1##*/}; can=$(readlink -f $1)
  deb2tgz $can
  fr=/tmp/fke$$
  mkdir $fr && tar xzf ${can%.*}.tgz -C $fr
  ren $pg
  sld $pg
  pushd .  > /dev/null
  cd $fr
  /sbin/makepkg -l y -c n  ${can%/*}/$f
  popd  > /dev/null
  rm -rf $fr
}

xz2txz()
{
  [[ ${1##*.} != xz ]] && { echo Not xz; return 1; }
  pg=${1##*/}; can=$(readlink -f $1)
  fr=/tmp/fke$$
  mkdir $fr && tar xJf $can -C $fr
  ren ${pg/.tar/}
  sld $pg
  pushd .  > /dev/null
  cd $fr
  /sbin/makepkg -l y -c n  ${can%/*}/$f
  popd  > /dev/null
  rm -rf $fr
}

s=${0##*/}
[[ ! -f $1 ]] && { ls $1; exit; }
$(eval echo ${s%.*}) $1
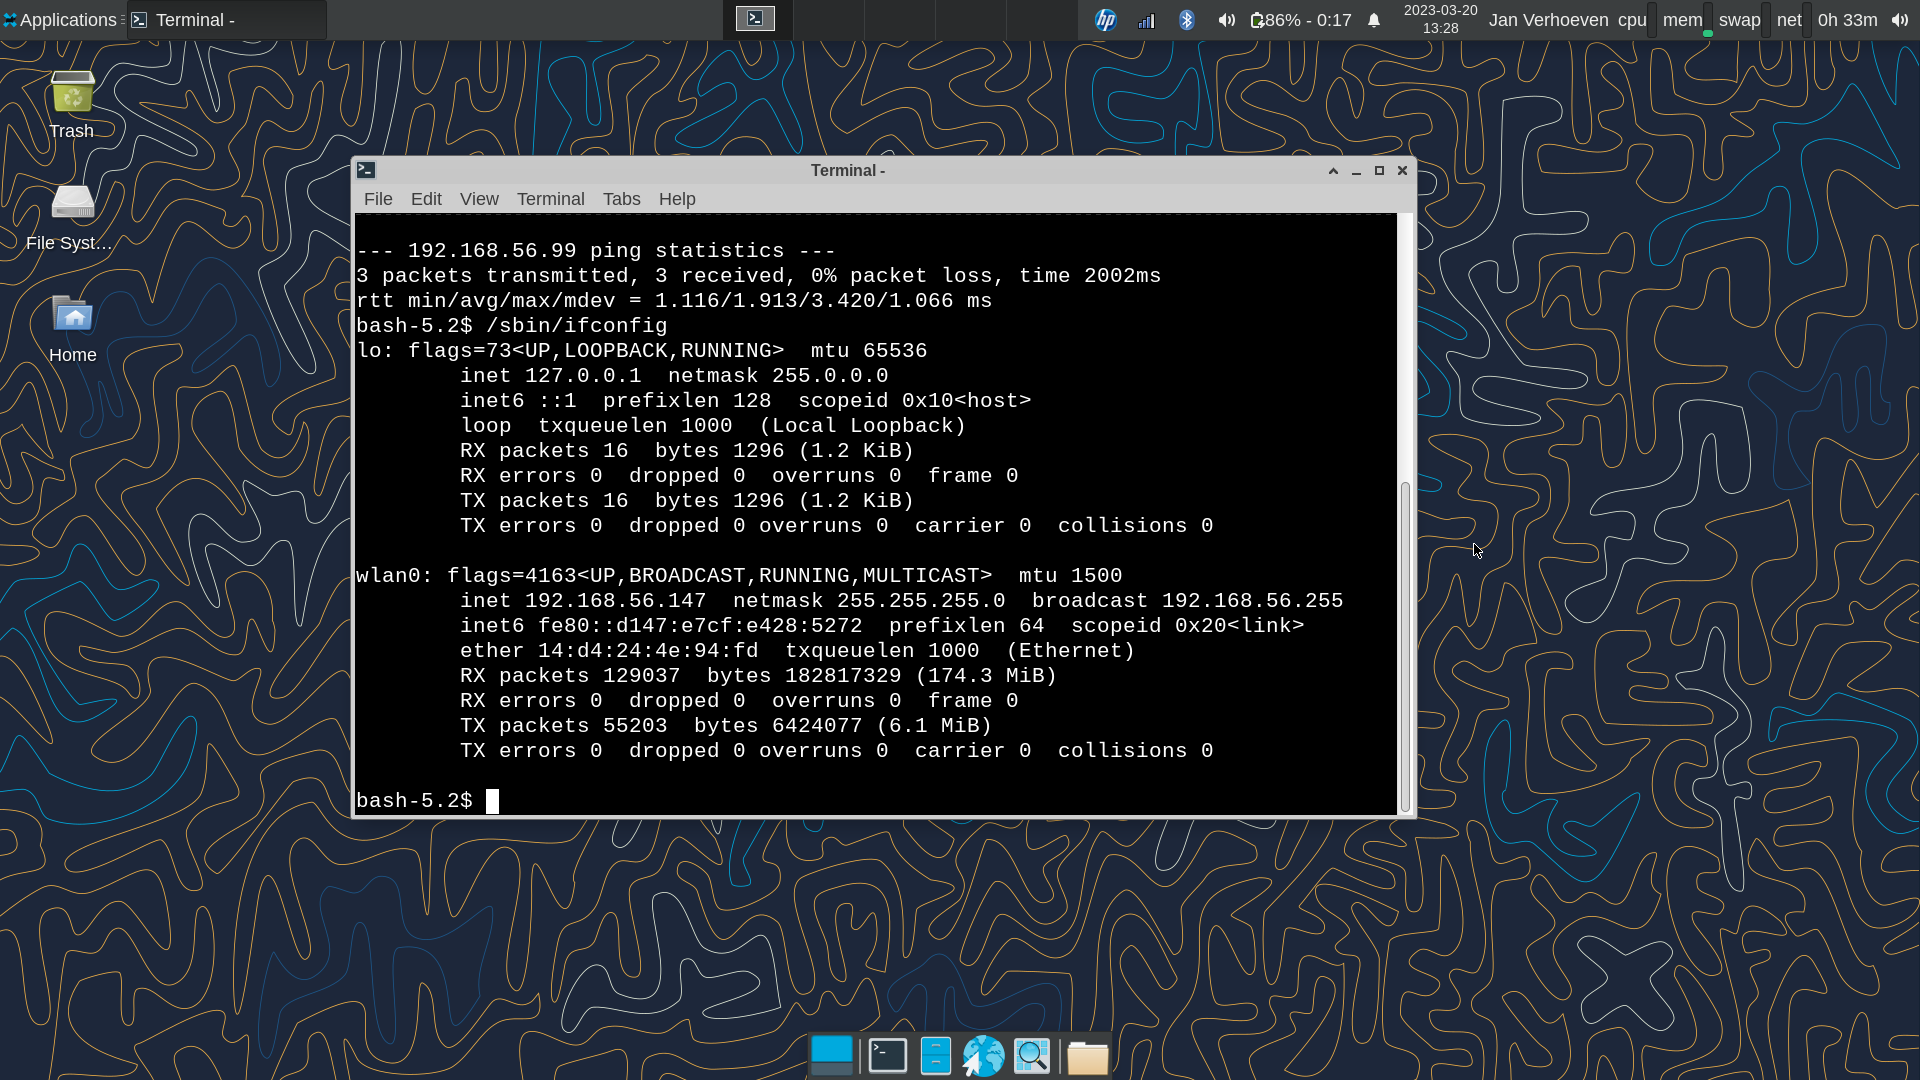
The nervous WLAN
When connected to a primary WLAN channel, the connection was rock solid. But when connected to a range extended signal of the same SSID, no matter if that WLAN channel has a different name (SSID) or not, the interface would be disconnecting faster than it would reconnect. This was rather annoying. At first I blamed the range extender, a TP link RE200 but it turned out to be the wlan driver:
/lib/modules/--version--/kernel/drivers/net/wireless/realtek/rtlwifi/rtl8821ae/rtl8821ae.koSo I borrowed the same driver from a later release and copied that over the 'original' one. Reboot and problem solved...
At least, it looked like that for a few days... Then, when the system locked on to the range extended signal, thr nervous (dis)connecting started all over again. The problem was solved by connecting to the original WLAN channels. The real solution was to get a very recent kernel (6.1.38) and compile that.
Compiling a new system
The troublesome WLAN made me wonder if a new kernel and ditto modules will be the solution. The installed system was Linux 6.1.19. I downloaded version 6.1.38 from kernel.org, made some tweaks in the config file. The new system is now compiling with
time make -j5It compiled at 100% CPU load for 50 minutes real and 184 minutes cpu time. not bad for an i3 machine.
See how I made an elilo boot script for the asus here.
Useful links
Some useful links for the Asus X415: